


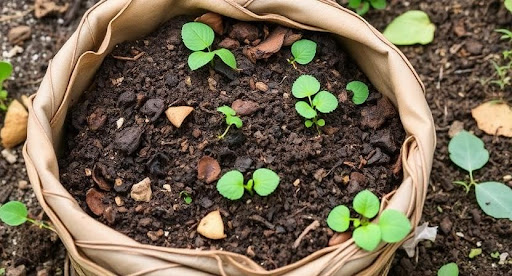
If you’ve ever wondered how to compost at home without complicated systems, strong odors, or wasted effort, this guide breaks it down step by step, so food scraps become real, usable black gold.
Most thriving gardens share the same quiet secret: compost.
Seasoned growers call it “black gold” for a reason. It’s the rich, crumbly, dark material that smells like a forest floor after rain, and it powers plant health from the roots up.
But before you can scoop up that finished compost, you need to master one thing: the balance between “greens” and “browns.” Many lawn and garden owners struggle here. Their pile sits, soggy or bone-dry, and never truly breaks down.
Often, the culprit is either an unbalanced mix of materials or neglecting temperature and oxygen. Composting microbes work best in a warm, active environment, most efficient between 131°F and 160°F. Not cold, not scorching, just pleasantly “hot” to the touch.
Instead of overcomplicating the theory, we’ll move straight into the practical side. By the end of this guide, you’ll understand how composting kitchen waste becomes a simple, sustainable way to keep your garden fertile, resilient, and beautifully alive.
Let’s bring your soil to life
Table of Contents
ToggleWhat is Composting?
Composting is a controlled decomposition process where carbon, and nitrogen, rich organic matter break down into a stable, nutrient-dense material. It’s nature’s recycling system, guided by you.
In practical terms, composting kitchen waste means taking everyday food scraps and transforming them into a stable material that feeds soil instead of filling landfills.
Your raw ingredients are things you usually throw away: vegetable peels, coffee grounds, grass clippings, fallen leaves.
The art lies in balancing two main groups:
- “Browns” dry, carbon-rich materials that add structure and air pockets
- “Greens” moist, nitrogen-rich materials that fuel microbial activity
If the ratio tilts too heavily toward greens, the pile turns wet and airless. That’s when you get the heavy, sour, sticky mess that smells more like a garbage bin than a compost pile.
Equally important is learning what not to compost. Not everything “organic” belongs in your bin. A study confirms that greasy foods, dairy, and meat scraps can derail the process by upsetting moisture levels and temperature stability.
A well-balanced heap runs warm and busy on the inside, ideally 131°F-160°F. Adding oily or fatty waste coats materials, blocks airflow, and cools the internal heat, leaving microbes starved of oxygen.
Why Composting Matters
Decomposition quietly returns nutrients to the earth every day, whether we pay attention or not.
Think of your kitchen waste. How often do you scrape a cutting board into the trash and feel a small twinge: “This could’ve gone back to the soil.” Those peels, stems, and grounds are packed with minerals your plants could use, if given the chance.
We throw away that potential constantly. Composting is simply choosing not to.
Here are 3 clear reasons composting is worth the effort:
- Nutrient-Enriched Soil:
Soil can absolutely “feed itself” when organic matter is steadily returned. Compost gently releases nutrients over time, building fertility without harsh spikes or crashes. - Thriving Ecosystem:
Compost doesn’t just feed plants, it feeds life in the soil. Once it touches the ground, worms, beetles, and countless decomposers move in, transforming food waste into plant-available energy and building a living, self-improving ecosystem. - Clean Environment:
Food scraps tossed in the trash often end up in landfills, where they rot anaerobically and generate methane, a potent greenhouse gas. Diverting that same waste to a compost bin turns pollution into productivity.
The Science Behind Composting
Composting can seem technical at first, but once you see how the pieces fit, it becomes intuitive. At its core, it’s a slow, steady transformation, not an instant one. Although the biological process stays the same, different composting methods influence how quickly materials break down and how much hands-on attention the pile requires.
Good things take time.
The moment you build your pile, you’re activating millions of bacteria and fungi. Their enzymes are incredibly efficient: they “digest” scraps without a stomach, breaking down complex materials into simpler forms plants can use.
To keep these microbes thriving, they need:
- Air – for aerobic respiration and consistent heat
- Moisture – to keep enzymes active and decomposition moving
The heat you feel in an active pile doesn’t come from the sun, it’s generated by the constant oxidation of organic materials as microbes work. That’s why a well-built pile can stay warm even in cool weather.
The figure below illustrates how every ingredient in your compost is interconnected. Even a small shift in the browns-to-greens ratio can slow everything down or bring the process to a halt.
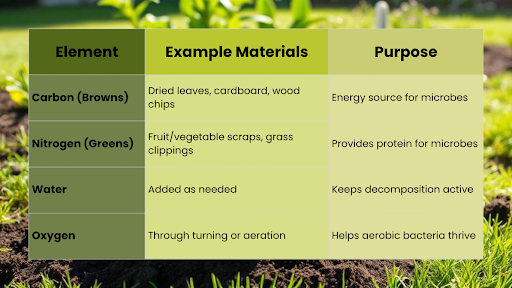
The simple formula to remember
3:1, browns to greens
Roughly three parts carbon-rich browns to one part nitrogen-rich greens keep the system humming.
How to Compost at Home: Step-by-Step Guide
Learning how to compost at home is less about perfection and more about maintaining the right balance between materials, moisture, and airflow over time.
Now that you understand the “why” and the basic science, it’s time to turn waste into actual black gold. Composting sounds complex, but in practice, it’s a series of simple, intentional steps.
From the moment the first leaf lands on your pile, microbes go to work. You may not see dramatic changes at first, but beneath the surface, decomposition is steadily underway. Your main job is to maintain balance, especially between greens and browns.
Step 1: Choose Your Composting Method
When you’re getting started, choosing between different composting methods is about finding an approach that genuinely fits your space, energy, and lifestyle. Some setups are hands-on, while others are nearly set-and-forget.
- Open backyard pile – A simple heap or bin in the yard is forgiving for beginners. It only needs periodic attention: dry leaves in fall, light additions of chopped weeds, and occasional turning to keep things aerated.
- Indoor composting (aerobic kitchen composting) – Ideal for small spaces and apartments. With the right container, ventilation, and sometimes worms, you can compost neatly and virtually odor-free, turning daily scraps into DARK GOLD without stepping outdoors.
- Tumbler composting – A closed, rotating bin that makes turning the pile easy and clean. By monitoring moisture and giving it a spin every few days, you accelerate decomposition and keep materials well mixed.
Step 2: Select a Spot
When scouting a location for your compost pile, the birthplace of your Black Gold, look for a shaded, slightly elevated area.
Direct sun may sound helpful, but it can dry out or overheat the pile quickly, stressing the microbes you rely on. Instead, aim for:
- Light shade or dappled sun
- Good drainage so water doesn’t pool around the base
Whenever possible, build your pile directly on bare soil, not on concrete or lined surfaces. This allows worms and other soil organisms to naturally move up into the pile, aerating it and speeding decomposition.
And remember: your compost needs to “breathe.” Leave enough space around it so air can circulate and the pile can expand slightly as you add materials.
Step 3: Gather your Materials
Before layering your future compost, take time to gather both carbon- and nitrogen-rich materials. This makes the building process smoother and more effective.
Carbon-rich “browns” provide structure, absorb excess moisture, and keep the pile from compacting:
- Leaves
- Straw
- Bark
- Hay
- Newspaper
Nitrogen-rich “greens” supply the fuel for microbial growth and generate heat:
- Coffee grounds
- Salad waste
- Fruit skins
- Tea leaves
There are also materials you should avoid. They don’t break down cleanly and tend to clog air channels, turning your pile from airy and earthy into a dense, smelly block. Steer clear of:
- Oily foods
- Dairy
- Meat, especially cooked or sauced pieces
These ingredients attract pests, slow decomposition, and disrupt the natural balance your pile needs.
Knowing what not to compost is just as important as choosing the right browns and greens, because a few wrong inputs can throw off moisture, airflow, and temperature fast.
Step 4: Build the Compost Pile
Composting is simply nature’s cycle of decay and renewal, guided by your hands. Billions of microbes are ready to do the work; you’re just setting the stage.
Here’s how to construct the pile from the ground up:
- Start with a foundation
Lay down a base of small branches, hay, or dry grass. This coarse, porous layer keeps air moving from below and prevents the pile from becoming waterlogged. - Add a thin layer of greens
Next, sprinkle on a light, even layer of nutrient-rich greens. Resist the urge to mound them thickly; clumps of wet material suffocate easily and create slimy pockets. - Cover with a brown layer
Follow with a balanced layer of browns to insulate the greens, absorb extra moisture, and maintain structure. Think of it as tucking your active ingredients under a protective blanket. - Inoculate with finished compost
If you have some, add a handful of already-finished compost. This “starter” introduces a robust community of microbes and speeds up the decay cycle from day one. - Moisten as you go
Lightly water each layer so the pile feels like a wrung-out sponge or damp garden soil, moist but never dripping. Too dry, and decomposition stalls; too wet, and airflow collapses. - Repeat the layers
Continue alternating greens and browns until your pile reaches your desired height.
Step 5: Maintain the Pile (Turning & Moisture)
This is where your compost truly benefits from your attention.
A thriving, odor-free pile needs a steady balance of air and moisture. Turning the compost redistributes materials, breaks up dense zones, and supplies fresh oxygen to hard-working microbes.
- Every 7–10 days, use a garden fork or rake to turn the pile, bringing outer materials toward the center and vice versa.
- If you’re using a tumbler, simply rotate it a few times every couple of days. This light mixing gives microbes access to new surfaces and helps the whole mass break down more uniformly.
As you turn, feel the texture and check for dryness or sogginess. Adjust with a sprinkle of water or a layer of browns as needed.
Step 6: Monitor Temperature and Progress
Your nose and a quick temperature check can tell you a lot.
If you notice a strong, unpleasant odor, especially an ammonia-like smell, it’s a clear warning sign. Typically, that means too many greens and not enough browns, or poor aeration.
Aim to keep the internal temperature of the pile around 135-160°F. Sustained extremes, either too hot or too cold, suggest imbalance.
When things are working well, over time you’ll see:
- Materials softening and losing their original shape
- The interior darkening into a fine, crumbly, dark brown to black humus
That’s your signal that you’re on the right track.
Step 7: Harvest the Compost
With compost, patience is always rewarded.
After about 2-6 months of regular layering, turning, and moisture management, you’ll end up with BLACK GOLD, a dark, earthy-smelling material that no longer resembles the scraps you started with.
You’ll know it’s ready when:
- Original ingredients are no longer recognizable
- The texture is uniform and crumbly
- The smell is clean, like rich garden soil
If you still see larger, clearly identifiable pieces, simply give them a bit more time, another week or two usually does the trick. They’ll eventually join the rest of the pile as finished compost, ready to fertilize your soil and quietly nourish your plants.
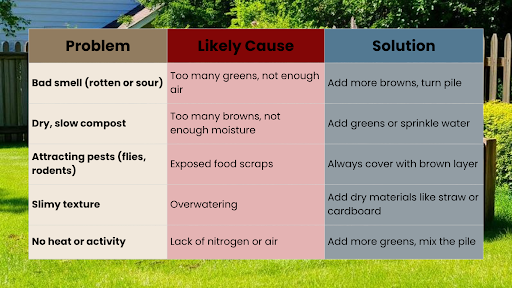
Dealing with Odor, Pests & Common Problems
Even well-tended compost can have its moments. A whiff of sourness, a fruit fly bloom, or a slow, stubborn heap can test your patience.
Instead of letting these small setbacks discourage you, treat them as feedback. Compost is constantly “talking” to you through smell, texture, and temperature. With a few simple adjustments, you can quickly steer it back into balance.
Composting Tips for Beginners
If you’re new to gardening, the greens-and-browns balancing act might seem intimidating at first. But remember: nature is doing the heavy lifting. You’re simply helping conditions stay favorable.
A few thoughtful habits can dramatically reduce frustration and keep your pile progressing smoothly:
- Chop materials smaller
Large pieces break down slowly and block airflow. Shred or chop them into smaller, confetti-like bits so microbes can work more efficiently and air can move freely. - Layer thoughtfully
Don’t dump huge clumps of one material in a single spot. Spread browns and greens in thin, even layers to avoid soggy or bone-dry pockets. Good layering equals better airflow and faster, more even breakdown. - Use a kitchen caddy
Collecting daily scraps is easier when you keep a small, dedicated container on your countertop. Empty and clean it weekly, and let it be your go-to spot for coffee grounds, peels, and trimmings. - Bury food scraps
To discourage pests, tuck fresh food waste beneath an existing layer of composting material. This simple step masks smells and reduces the chance of unwelcome visitors. - Turn regularly, but gently
Light, consistent turning keeps oxygen and heat distributed through the pile. Think of it as a small, regular workout, for your arms and for your compost. - Go easy on citrus and onions
Worms and other compost dwellers can be sensitive to strong, acidic materials. Too many citrus peels or onion scraps create a harsh environment where worms retreat and decomposition slows. Balance is key here.
Benefits of Using Compost in Your Garden
Compost is often described as a natural fertilizer, but its role is far more comprehensive than simply “feeding plants.”
It improves the soil’s physical structure, moderates pH, supports seedlings, and steadily reduces your garden’s carbon footprint over time.
Here are some of the most impactful ways compost elevates plant health and soil performance:
1. Improves Soil Structure
When you mix compost into your beds, it transforms the soil’s texture. Heavy clay becomes looser and better draining; sandy soil holds water more effectively. Microbial life flourishes, creating a crumbly, resilient structure that suits a wide range of plants.
2. Provides Balanced Nutrients
Store-bought fertilizers can be tricky to manage and easy to overapply. Compost, on the other hand, delivers a broad spectrum of nutrients, nitrogen, phosphorus, potassium, and trace minerals, in slow-release form.
This gentle, steady nutrition supports robust seedlings and mature plants while reducing the risk of nutrient burn.
3. Supports Beneficial Microbes
Strong roots develop in living soil. Compost feeds beneficial bacteria and fungi that form a protective, cooperative community around roots.
These microbes help plants access nutrients, buffer stress, and create a natural line of defense against many soil-borne issues.
4. Enhances Moisture Retention
Soils lacking organic matter dry out quickly and struggle to hold water. Compost-rich soil behaves differently: it feels softer, more spongy, and capable of retaining just the right amount of moisture.
As compost and microbes create humus, your beds hold water longer, meaning less frequent watering and more resilient plants, especially in heat or drought.
Composting Indoors: Apartment-Friendly Options
No yard? No problem. You can still compost cleanly and effectively inside your home.
These systems are especially useful for composting kitchen waste, allowing food scraps to be processed efficiently even without access to outdoor space.
Two excellent indoor-friendly methods are:
- Bokashi Composting
- Worm Composting (Vermicomposting)
Both options keep odors under control and fit neatly into apartment living while allowing you to transform kitchen scraps into nutrient-rich material.
Final Thoughts
Composting is entirely doable at home, whether you have a sprawling backyard or just a balcony and a small bin. Every intentional step, from layering correctly to maintaining moisture, contributes to a healthier garden and a lighter environmental footprint.
You can use finished compost as a soil amendment by blending it into sand or clay around plant bases to offer immediate nutrition. Spread it as mulch in your beds every few months, and you’ll begin to notice soil that feels softer, more porous, and pleasantly earthy in your hands.
That kind of soil holds moisture, carries minerals directly to root tips, and quietly supports steady, vigorous growth.
Isn’t that the purest form of abundance? Absolutely.
Once you know how to compost at home, the process stops feeling like a chore and becomes a simple habit that quietly improves soil, reduces waste, and strengthens your garden over time.